
As a sound engineer, one of the best things in any workday is discovering that a band has a correct, up to date stage plot.
See, the difference between a good show and a great show often comes down to preparation. A key aspect of this preparation is having a stage plot and input list. Often overlooked by emerging bands, a stage plot can significantly impact the smoothness of a performance and your relationship with venue staff.
The Role of a Stage Plot and Input List
A stage plot and input list are not just administrative formalities; they are essential tools that ensure venue staff understand your band's setup and sound requirements. This understanding is crucial for a seamless sound check and, ultimately, a successful show.
1. Input List: A Detailed Picture
An input list details every instrument, or “source”, that needs to be connected to the venue's PA system.
This list should be specific and organized, typically starting with drums, followed by bass, guitars, keyboards, horns, and ending with vocals and tracks.
It's essential to list these in a logical order, following industry standards, to avoid confusion. For instance, kick drums are usually listed first, followed by snares, toms, and cymbals.
Avoid the temptation to list vocals first – this is a common mistake I see church engineers make and goes against the industry standard.
2. Stage Plot: A Visual Guide
A stage plot provides a visual representation of where each band member and their equipment will be located on stage.
It's crucial for this to be clear and accurate, reflecting the actual stage setup from the audience's perspective. This helps the venue's technical team to efficiently set up microphones, monitors, and other equipment according to your band's specific needs before you even get to the venue.
The Benefits of Being Prepared
Having a well-prepared stage plot and input list offers numerous advantages:
- Efficient Sound Check: With clear documentation, sound engineers can quickly and accurately set up for your performance, ensuring that sound checks are efficient and effective.
- Professional Impression: Providing these documents in advance or when requested shows that your band is professional and serious about your performance, making a positive impression on venue staff.
- Better Sound Quality: A clear understanding of your band's setup enables sound engineers to mix your performance more effectively, resulting in better sound quality for your audience.
Creating Your Documents
Creating a stage plot and input list might seem daunting, but there are easy tools available online to create a stage plot.
Realistically, any band can easily make a stage plot and input list. Once created, they should be kept up to date and readily available to share with venues and sound engineers, both digitally and in print form.
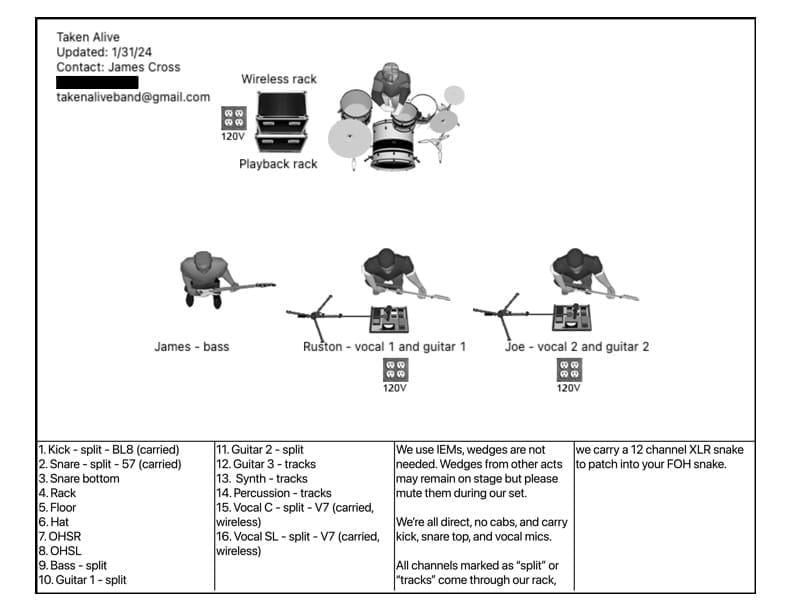
Here's a stage plot I created for my own band, Taken Alive:
Essential Elements of a Stage Plot
A stage plot is not merely a diagram; it's a comprehensive guide that communicates your band's technical and spatial requirements to the venue's production team.
To ensure clarity and efficiency, certain key elements must be included in every stage plot. Here's what you need to cover:
1. Band Name and Contact Information
At the top of the document, clearly state the band's name and the contact information of the person responsible for technical arrangements (often a band member or tour manager). This ensures the venue knows how to get in touch with you if they have any questions. List both your email address and phone number, not just one or the other.
2. Stage Layout
The core of the stage plot is a visual representation of the stage, showing where each member stands and where each piece of equipment is placed.
The stage plot should be drawn from the audience's perspective, with the “front” of the stage, known as downstage, at the bottom of the page and the “back” where the drums are, known as upstage, at the top of the page.
3. Input List
While it's often a separate document, integrating a simplified input list into your stage plot can be incredibly helpful.
Indicate what inputs you'll need for each instrument and your preferred microphone, if you have one. If you’re bringing your own mic(s), indicate that next to each input where you have your own.
4. Monitors and In-Ear Systems
Clearly mark the position of each monitor wedge and specify if any band members use in-ear monitoring systems.
5. Power Requirements
Indicate where you need power outlets for your equipment. This helps the venue to plan and ensure that power distribution is in place and meets your needs.
6. Special Instructions or Preferences
If there are specific requirements or preferences regarding lighting, sound effects, or stage dimensions, include a section for these notes. This could cover anything from the preferred height of the drum riser to the need for certain effects during your set.
7. Symbols and Legend
Use universally recognized symbols for common items (like microphones, monitors, or DI boxes) and include a legend if you use any symbols that aren't standard. This keeps your stage plot easy to read and understand at a glance.
8. Version Date
Include the date when the stage plot was last updated. This ensures the venue staff is working with the most current information, especially if you make changes between shows.
Conclusion
While creating a stage plot and input list may require an investment of time and effort, the benefits they provide in terms of sound quality, professionalism, and overall performance quality are immeasurable. As the live music scene continues to evolve, being prepared with these documents is not just recommended; it's essential for any band who is serious about their craft and their career.
If you need help creating a stage plot for your band, I can help with that! Shoot me an email at [email protected]

© 2023 Bandhive
A division of Don't Overthink This, LLC